This documentation was updated on the 28th July 2020. It is still a work in progress. Please email website-help@cityofsanctuary.org for any further help.
Please note: We have made some significant changes to our website in 2020. If you find anything that you think isn’t working properly, please do let us know so we can fix it. We have a budget for improving the way the website works for all groups, so we really want to hear about your ideas, suggestions, and needs.
Important terminology – do read this first 😊
- Front End. This is the website as seen by the public: the public facing, or “front” part of a website.
- Admin Area. This is the “back end” of a WordPress site – only available to editors and administrators. Because its main page is called the “Dashboard”, the terms Admin Area and Dashboard can be used interchangeably.
- Theme. In a WordPress website, the Theme controls the way the website looks (fonts, colours), how it’s laid out, and what layout options are available. City of Sanctuary provides a theme for groups, and we recommended all groups use this. Theme settings for your website are mostly controlled through the “Customiser”.
- Featured Images. These are the images shown with your News and Events in lists, and form the main header image at the top of content.
- Admin Bar. This is the black bar at the top edge of the screen. If your account has permission, you see this when you’re logged in. It provides shortcuts to the most commonly used things in your Admin Area.
- Admin Sidebar. Part of the Admin Area, this is the menu down the left of the screen, where we navigate all the options in the Admin Area.
- Shortcode. This is a snippet of code enclosed in square brackets. They’re a more advanced and complex aspect of WordPress that are becoming less necessary as time goes by. Within a year or two there may not be any need for them. We haven’t offered very much documentation about them here, except a few of the simpler possibilities. If you see one you’d like to use here, you can just copy and paste it into almost any text editing area of your site.
Featured Images
When you add Pages, Posts, or Events, you can add a “Featured Image”. You don’t have to, but you’ll make your content much more vibrant if you can find good images to go with it.
The City of Sanctuary theme will automatically switch between a couple of different ways of laying out your featured images, depending on their size. Wide, short images (proportioned like a cinema screen) will be shown in a full-width banner. Other images will be shown smaller, alongside the title of your post.
Changing your website’s appearance – Customiser
Most of the choices you can make about the way your website looks can be controlled through the “Customiser”. If you’re logged in and have permission, you can enter the Customiser by clicking the “Customise” link in the Admin Bar. Or, in the Admin Area, it’s under Appearance > Customise.
When you’re in the Customiser, all your options are grouped under Tabs on the left of the screen. The things you change are shown “live” on the right of the screen. Changes are not saved and made public until you click the blue “Publish” button above the Customiser Tabs. So you can feel free to try things out, and you can click the “X” button to close the Customiser without saving/changing anything.
Most of the “look and feel” controls are under “Site Design”. You are also likely to want to add your Social Media details under the dedicated “Social Media” tab. Here’s a break down of the options by tab. This is not a complete list.
Site identity
- Site title. This is the title of your website. It should be the full name of your group.
- Tagline. This is used by the Theme to create the full title of your home page as it appears in search engines or bookmarks. It is not currently shown anywhere in the contents of the website itself.
- Logo. If your group has its own logo, you can upload it here. Uploading a logo will make the Group Type and Layout controls irrelevant.
Site Design
- Short name, Group Type, Layout. These all work together to automatically create your group’s logo. Experiment with them in the Customiser to understand your options. The Short name is particularly important, as this is what will be shown in network-wide lists to attribute your news and events to your group.
- Colour Scheme. This option allows you choose a colour scheme from a drop-down list. We don’t have any documentation yet about the different colour options. So you should experiment with them to see which one you’d prefer. As with all Customiser settings, nothing will be changed for the public until you click the blue “Publish” button.
Note: Not all colour schemes are as accessible and readable as we’d like. We will improve these, and so the colours may shift a little during 2020. - Torn or clean edges. This affects the style of the main navigation bar, and also the edge of featured images and the footer. City of Sanctuary’s core brand style incorporates torn edges to suggest a community, “DIY” feel to the website whilst still looking professional and tidy. If your group would prefer clean lines, then you have that choice here.
- Footer Text. Any text you add here is shown at the bottom of your site’s footer. It’s useful for copyright notices. You have some simple formatting controls, and can add Shortcodes for the copyright symbol, the current year, and your site name (examples are shown in the Customiser, so you can copy and paste).
Social Media
- Show social media sharing buttons? Tick this box if you’d like the site to show buttons under each page to share it on Social Media. You do not have to have any social media accounts for your group to use this.
- Twitter name. This enables the website to attribute itself to a Twitter account you name here. If you’ve got a Twitter account for you group, go ahead and add it here. But don’t worry if you haven’t.
- Social Media Links. If you have any social media accounts for your group, you should add them here. For each one, you need only type its title and the full URL of your account. The website will pick the correct icons to show for them. You can add as many as you like, and they’ll be show at the top right of your website’s header area.
Menus
We can only offer outline advice on menus for now. Please do reach out to website-help@cityofsanctuary.org if you’d like any specific support with your menus.
You can build your website’s menus and navigation here, and experimenting in the Customiser can be a good way to learn what’s possible.
Menus can be assigned to one of three areas:
- The Main Menu. The coloured navigation bar in your site’s header.
- Secondary Menu. Shown as a simpler list of links in the top right of your site’s header. Adding the text “button” to the “CSS Classes” option for any menu item assigned to the Secondary Menu will make it appear as a button. This can be useful for highlighting “Donate” links, making them into a “call to action”.
- Footer links. A simple list of links in your footer area.
Widgets, Home Page Setttings
We haven’t documented these yet. Please consult the general WordPress documentation, or reach out for help to website-help@cityofsanctuary.org.
Tags and Categories
Tags and Categories are a feature of Posts and Pages that allow you to group your content together, and help visitors to find related articles.
Having what are effectively two ways of categorising articles can be confusing, but it does allow you the flexibility to organise your website however you like. You don’t have to use either of these things. But if you’d like to…
WordPress.com has some useful advice on this question. As far as City of Sanctuary groups are concerned, one good approach is to use Categories for major groupings, such as specific projects you’re running; whereas Tags could be used for topics and issues that an article also relates to.
Extras – Events, Partners, Regions
The City of Sanctuary theme includes systems for publishing events, and for easily showing your funders or partners. These systems are not turned on by default, to keep group websites as simple as possible for groups who don’t need these.
To turn on these extra features, log in, go your dashboard, and then go to Settings > City of Sanctuary Network. You’ll find these options:
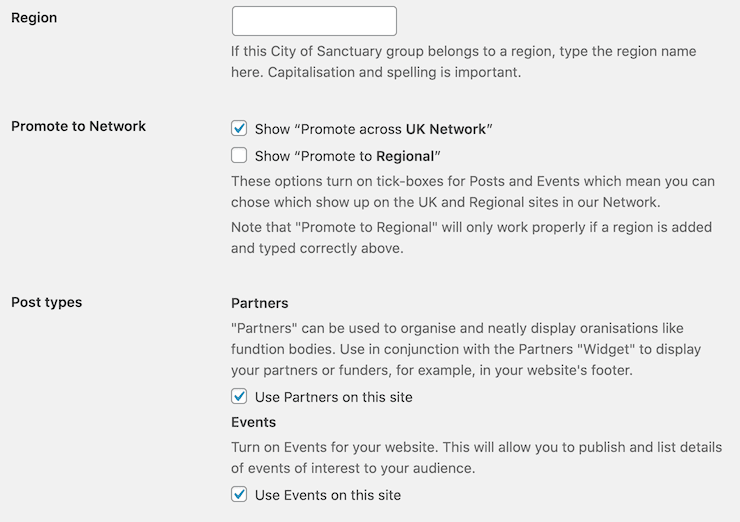
Region. If your group belongs to a region, for example, “Wales”. Type it in here.
Promote to Network. These tick boxes allow you to promote to your news and events to regional or national websites in the network.
Post types. If you want to publish events on your website, or show a list of your funder or partners, you should turn on one or both of these options. When you’ve done this, you’ll find extra sections in your dashboard for adding these (may require a refresh to see the extra sections).
Events
With the Events system turned on (see above), you’ll be able to add events. This is very much the same as adding posts, except you’ll find you have a few extra fields to fill out with the date, time, and venue information for the event.
Events will be shown at your URL with /events on the end. So if your website is https://leicester.cityofsanctuary.org, your events will be found at https://leicester.cityofsanctuary.org/leicester. Once you’ve got some events added, you should also add a “Custom Link” with this URL to one of your menus so people can find your events.
Your main events list will only show events which are in the future, so you don’t have to remember to remove them once they’re out of date. However, the events list does automatically show a link to past events in an “archive”. Anybody viewing a past event will be shown a clear notice that the event has taken place.
As well as your main events page, you can also add an “Events” widget to your sidebar. This will show a compact list of any future events.
Partners
With the Partners system turned on (see above), you’ll be able to easily show your funders or partners on your site. We’d recommend the following steps:
- Add one or more Partners. It’s similar to adding news, although much easier. Do add a logo for each Partner, and a link to their website.
- Once you’ve got some Partners added, go to Appearance > Widgets, and add the Partners widget to either your Second Footer. We recommend the Second Footer, because this is always shown full-width underneath any other Footer Widgets you might add.
- That’s it – check the results on your website! Your Partners should now be showing up in the footer of all your pages.
Because Partners are added as a widget like this, you’ve got the freedom to place them anywhere on your site. But this suggestion should work for most groups.